Introduction
Paragraph formatting in LaTeX refers to the process of defining the appearance and layout of text blocks. This can include adjusting the margins, line spacing, indents, justification, and other visual aspects of the text. The goal of paragraph formatting is to enhance readability and improve the overall presentation of the document. In this section, we will explore the various options available for formatting paragraphs in LaTeX.
Paragraph formatting using LaTeX packages
There are several packages that provide advanced paragraph formatting capabilities. Some of the most commonly used packages for this purpose include:
parskip→ Adds extra vertical space between paragraph.setspace→ Sets line spacing for individual paragraphs.ragged2e→ Provides a flexible way to format ragged paragraphs.
It's important to note that the default LaTeX document class already provides basic paragraph formatting options. However, these packages can provide more advanced options and greater control over the appearance of paragraphs.
The parskip package
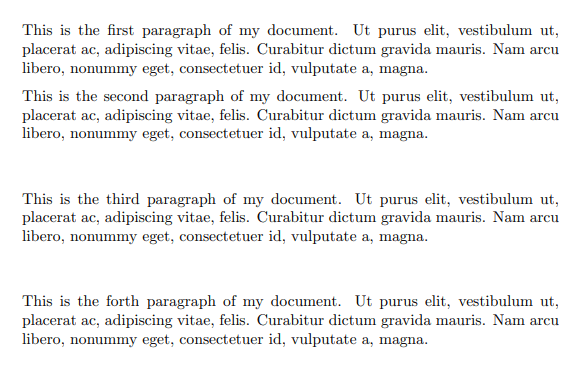
The parskip package is a LaTeX package that provides a simple way to change the spacing between paragraphs. By default, LaTeX adds an indentation to the first line of each paragraph and adds extra space between paragraphs. The parskip package provides an alternative approach where there is no indentation at the beginning of a paragraph, and instead a vertical space is added between paragraphs.
Here's an example of how to use the parskip package in a LaTeX document:
\documentclass{article}
\usepackage{parskip}
\usepackage{lipsum}

\begin{document}

This is the first paragraph of my document. \lipsum[1][2-4]

This is the second paragraph of my document. \lipsum[1][2-4]

\setlength{\parskip}{30pt}

This is the third paragraph of my document. \lipsum[1][2-4]

This is the forth paragraph of my document. \lipsum[1][2-4]

\end{document}
This example generates the following output:

Tips:
\lipsumcommand is used to generate dummy text.- The
parskippackage should be included in the preamble of your LaTeX document using\usepackage{parskip}. - After including parskip package, you can use your document as usual, and the parskip will automatically adjust the spacing between paragraphs.
- After compiling this document, you will see that there is no indentation at the beginning of each paragraph, and a vertical space has been added between paragraphs.
- The
\setlength{\parskip}{30pt}command is used to add 30pt of space above and below third paragraph.
The setspace package
The setspace package provides a convenient interface to set the line spacing in a LaTeX document. With this package, you can easily switch between single, one-and-a-half, and double line spacing, or set your own custom spacing.
Here's an example of how to use the setspace package to set double line spacing:
\documentclass{article}
\usepackage{lipsum}

\usepackage{setspace}
\doublespacing

\begin{document}
\lipsum[1][2-8]
\end{document}
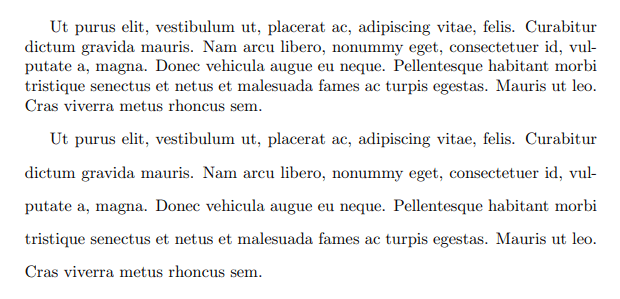
This example generates the following output:

Without using \doublespacing command, the paragraph is like the following:

The \doublespacing commands can be used in the preamble of document as shown in above example but sometimes it’s better using an environment to change vertical spacing locally, like:
\begin{doublespace}
...
\end{doublespace}
Here is an example of changing vertical spacing locally:
\documentclass{article}
\usepackage{lipsum}
\usepackage{setspace}

\begin{document}

% First paragraph
\lipsum[1][2-8]

% Second paragraph with double spacing environment
\begin{doublespace}
\lipsum[1][2-8]
\end{doublespace}

\end{document}
The doublespace environment applied to the second paragraph. This example generates the following output:

The setspace package provides many commands to modify and customize the line spacing in your document, including:
| Command | Description |
|---|---|
\setstretch{factor} | Changes the line spacing to factor times the normal line spacing, where factor is a number. For example, \setstretch{1.5} increases the line spacing by 50%. |
\doublespacing | Sets the line spacing to double spacing (i.e., \setstretch{2}). |
\singlespacing | Sets the line spacing to single spacing (i.e., \setstretch{1}). |
\onehalfspacing | Sets the line spacing to one-and-a-half spacing (i.e., \setstretch{1.5}). |
\linespread{factor} | Changes the line spacing for the entire document. |
The ragged2e package
The ragged2e package provides a collection of tools to control the text formatting in your LaTeX document. The main purpose of this package is to allow you to typeset text with a ragged or unjustified edge, rather than a fully justified edge, which is the default in LaTeX. The main commands and environments provided by ragged2e are:
| Command | Description |
|---|---|
\raggedright | Changes the current text block to be typeset with a ragged right edge. |
\raggedleft | Changes the current text block to be typeset with a ragged left edge. |
\justifying | Typesets text with full justification, while still allowing the last line of a paragraph to be ragged. |
Here is a basic example showing the use of \raggedright and \raggedleft commands:
\documentclass{article}
\usepackage{ragged2e}
\usepackage{lipsum}

\begin{document}

\section{ragged2e Package Example}

\subsection{Left aligned paragraph using \texttt{\string\raggedright} command}
\raggedright
\lipsum[1][2-8]

\subsection{Right aligned paragraph using \texttt{\string\raggedleft} command}
\raggedleft
\lipsum[1][2-8]

\end{document}
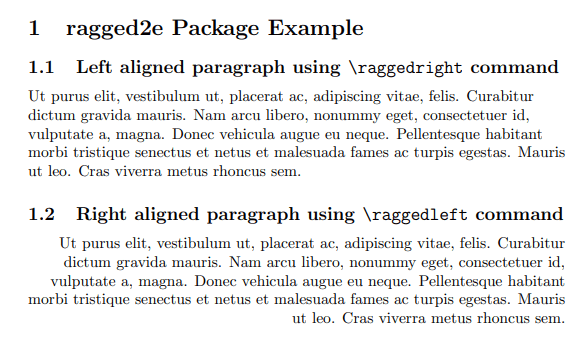
This example generates the following output:

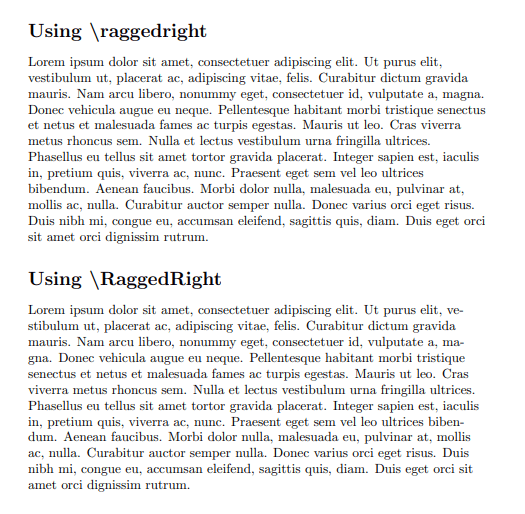
The LaTeX command \raggedright may sometimes produce a text that appears "too ragged". To resolve this issue, the ragged2e package provides a solution by using the \RaggedRight command, allowing hyphenation when a line is too short, resulting in a more evenly spaced right edge of text.
Here is an example to demonstrate the difference between the \raggedright and \RaggedRight commands:
\documentclass{article}
\usepackage{ragged2e}
\usepackage{lipsum}

\begin{document}

\section*{Using \textbackslash raggedright}
\raggedright
\lipsum[1]

\section*{Using \textbackslash RaggedRight}
\RaggedRight
\lipsum[1]

\end{document}
This example generates the following output:

In the above example, the text typeset using \raggedright will have an uneven right margin, while the text typeset using \RaggedRight will have a more uniformly ragged right margin, as the latter allows for hyphenation when a line is too short.
The ragged2e package provided the same command for aligning left, \RaggedLeft, that allows hyphenation and better spacing to produce a more aesthetically pleasing result.
Paragraph formatting using LaTeX commands
Paragraph formatting can be also achieved by using the following commands:
| Command | Description |
|---|---|
\indent | Used to specify the amount of indentation for the first line of a paragraph. |
\paraent | Used to start a new paragraph. |
\noindent | Used to turn off indentation for a specific paragraph. |
\linebreak | Used to insert a line break within a paragraph. |
\vspace | Used to insert vertical space within a document. |
\hspace | Used to insert horizontal space within a document. |