Introduction
This section will give a general introduction to the concept of lengths in LaTeX, including what lengths are and how they are used to control the layout and formatting of a document.
Length in Latex
In LaTeX, a length is a value that can be used to specify the size or position of various elements in a document, such as the margins, font size, and inter-line spacing. Lengths are typically specified in terms of points, inches, centimeters, or millimeters.
There are several commands in LaTeX that can be used to change the length of various elements in a document. Some of the most commonly used commands include:
| Latex Length Command | Description |
|---|---|
\textwidth | Sets the width of the text area in a document |
\textheight | Sets the height of the text area in a document |
\columnsep | Sets the distance between columns in a multicolumn layout |
\linewidth | Sets the width of the line in a document |
\parindent | Sets the amount of indentation at the beginning of a paragraph |
\baselineskip | Sets the distance between the baselines of consecutive lines in a paragraph |
\hspace | Insert horizontal space |
\vspace | Insert vertical space |
Here's an example of how changing the length parameters of one command can affect the output in LaTeX:
\documentclass{article}
\usepackage{lipsum}

\begin{document}

\section{Example}
\subsection{Original}
\lipsum[1][4-8]

\subsection{Increased Line Spacing}
\setlength{\baselineskip}{1.5cm}
\lipsum[1][4-8]

\end{document}
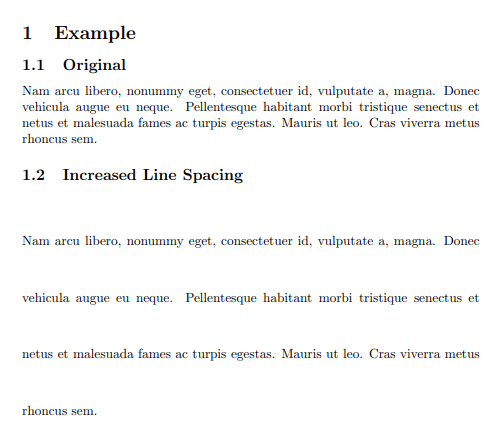
In this example, we have a text in two different sections, in the first section it's the original text, and in the second section, we increased the line spacing, as shown in the following generated output:

Tips:
- The command
\baselineskipis used to set the distance between the baselines of consecutive lines in a paragraph. The default value of this command is usually set by the document class, but you can use the\setlengthcommand to change it. - In the above example
\lipsumcommand is used to generate dummy text.
Here's another example of how changing the length parameters of one command can affect the output in LaTeX:
\documentclass{article}
\usepackage{graphicx}
\begin{document}

\section{Example}
\subsection{Original Image}
\includegraphics[width=4cm]{image.jpg}

\subsection{Increased Image Width}
\setlength{\linewidth}{8cm}
\includegraphics[width=\linewidth]{image.jpg}

\end{document}
In this example, an image is included in two different sections, in the first section it's the original image, and in the second section, the width of the image is increased, as shown in the following generated output:
In above example, the \includegraphics command is used to include an image in a LaTeX document, the command accepts options that can be used to control the size of the image. In the first section, an image is included with a width of 4cm. In the second section, the width of the image increased by setting the value of \linewidth to 8cm.
Define a new length command
You can also define your own length commands with the \newlength command and set their value with the \setlength command. For example, you can define a new length command called \mylength and set its value to 5cm like this:
\newlength{\mylength}
\setlength{\mylength}{5cm}
and then use it in your document. For example, you can use it to specify the size of an image like this:
\includegraphics[width=\mylength]{example.jpg}
LaTeX measurement units
There are several measurement units in LaTeX that can be used to specify lengths, including:
| Abbreviation | Definition |
|---|---|
| pt | The basic unit of measurement in LaTeX, 1pt is equal to 1/72.27 inch. |
| cm | A centimeter, equal to 28.45pt. |
| mm | A millimeters equal to 2.845pt. |
| in | 1 inch is equal to 72.27pt. |
| pc | A Pica is equal to 12pt, used in typography for measuring column widths, margins, and other layout elements. |
| ex | The height of the letter 'x' in the current font. Its value depends on the font used. |
| em | The width of the letter 'M' in the current font. Its value depends on the font used. |