Tables
Tables are an essential element of academic and technical writing, and LaTeX provides a powerful set of tools for creating professional-looking tables of all kinds. In this section you will learn how to create, format, and customize tables in your documents to present data and information in a clear and organized way.
Introduction
LaTeX provides a powerful and flexible system for creating professional-looking tables. Tables can be used to present data, information, or results in a structured and organized manner, and they can be customized to meet specific formatting requirements.
This section explains how to use LaTeX to create and customize tables: changing size/spacing, combining cells, applying color to rows or cells, and so forth.
The table environment
The table environment in LaTeX is used to create floating tables that can be positioned independently within the document. It provides features such as automatic numbering, captions, and the ability to reference the table using labels.
The basic syntax of using the table environment in LaTeX is as follows:
\begin{table}[placement]
    \caption{Caption text}
    \label{labelname}
    \begin{tabular}{column formatting}
        % table content
    \end{tabular}
\end{table}
In this syntax:
\begin{table}[placement]and\end{table}→ These commands define the beginning and end of the table environment. The optional placement argument specifies where the table should be placed in the document, such as:
h→ "here" (attempt to place the table at the current position)t→ "top of the page"b→ "bottom of the page"p→ "separate page"
LaTeX will try to honor the placement preference, but it may adjust the position based on the available space.
-
\caption{Caption text}→ This command is used to provide a caption for the table. -
\label{labelname}→ This command is used to assign a unique label to the table. -
The
tabularenvironment → The table environment usually contains a tabular environment, which is responsible for defining the structure and content of the table. The tabular environment uses a combination of columns and rows to organize data into a table format. It will be covered in the next section.
Creating table using the tabular environment
To create a simple table in LaTeX, you can use the tabular environment. Here is the basic syntax for creating a table in LaTeX:
\begin{tabular}[pos]{table spec}
   table content
\end{tabular}
Where:
pos→ this argument is optional and is used to specify the vertical position of the table on the page:
t→ topb→ bottomc→ center
table spec→ this argument is used to specify the number of columns in the table and the alignment of the text within each column. Here are some examples of common table spec options:
l: left-aligned columnc: center-aligned columnr: right-aligned column|: vertical line separator between columns
For example, if you want to create a table with 3 centered columns, the table spec argument would be {c c c}.
- The content of the table will be added in between the
\begin{tabular}and\end{tabular}commands.
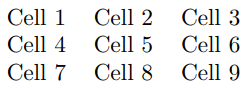
Here is an example of a basic table with three columns and three rows:
\documentclass{article}

\begin{document}

\begin{tabular}{ c c c }
 cell1 & cell2 & cell3 \\
 cell4 & cell5 & cell6 \\
 cell7 & cell8 & cell9
\end{tabular}

\end{document}
Code description:
\begin{tabular}{ c c c }→ This command begins a new table environment and specifies that the table will have three columns, each centered (c) within its respective cell.&→ This symbol is used to separate the cells in a row.\\→ is used to start a new row.cell1 & cell2 & cell3 \\→ This creates the first row of the table, with three cells containing the text "cell1", "cell2", and "cell3", separated by the ampersand&character. The double backslash\\indicates the end of the row and the start of a new one.- The next two rows have the same content, but the third row is not terminated with a double backslash
(\\), because it is the final row of the table and there is no need to separate it from any subsequent rows. \end{tabular}→ This command closes the table environment.
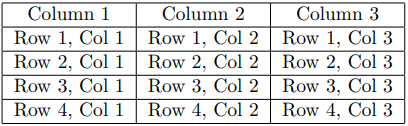
With the tabular environment, you have the flexibility to include separator lines between each column, providing additional structure and visual clarity to your table:
\documentclass{article}

\begin{document}

\begin{tabular}{|c|c|c|}
\hline
Column 1 & Column 2 & Column 3 \\
\hline
Row 1, Col 1 & Row 1, Col 2 & Row 1, Col 3 \\
\hline
Row 2, Col 1 & Row 2, Col 2 & Row 2, Col 3 \\
\hline
Row 3, Col 1 & Row 3, Col 2 & Row 3, Col 3 \\
\hline
Row 4, Col 1 & Row 4, Col 2 & Row 4, Col 3 \\
\hline
\end{tabular}

\end{document}
Here is a description of the syntax used in the example above:
|→ This character is used to create vertical separator lines between the columns.{|c|c|c|}→ Specifies that the table should have three columns, and vertical lines should be placed between each column. The content of each column will be centered within its cell.\hline→ This command is used to draw a horizontal line across the width of a table.
Using multiple lines in tables can help create a more structured layout, allowing you to present data in a more organized and visually appealing way. For example:
\documentclass{article}

\begin{document}

\begin{tabular}{||c|c|c||}
\hline
Column 1 & Column 2 & Column 3 \\
\hline\hline
Row 1, Col 1 & Row 1, Col 2 & Row 1, Col 3 \\
\hline
Row 2, Col 1 & Row 2, Col 2 & Row 2, Col 3 \\
\hline
Row 3, Col 1 & Row 3, Col 2 & Row 3, Col 3 \\
\hline
Row 4, Col 1 & Row 4, Col 2 & Row 4, Col 3 \\
\hline
\end{tabular}

\end{document}
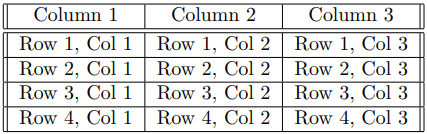
In the above example:
{||c|c|c||}→ Specifies a table with three centered columns, separated by vertical lines, and with double vertical lines on either side of the table.\hline\hline→ This line draws a double horizontal line, emphasizing the separation between the header row and the data rows.
Formatting table cells and rows
Formatting table cells and rows with rules and spacing is an important aspect of creating visually appealing and well-structured tables in LaTeX. It allows you to enhance the clarity and readability of your tables. In this section, we will explore key points and techniques for customizing the appearance of cells and rows in LaTeX tables.
Spacing
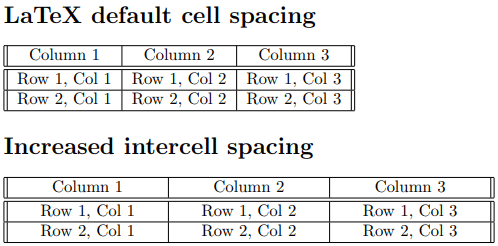
Table spacing in LaTeX refers to the vertical and horizontal space between cells, rows, and columns in a table. By adjusting the spacing, you can control the appearance and readability of your table. There are two aspects of table spacing that you can modify: intercell spacing and interrow spacing.
1. Intercell Spacing
Intercell spacing refers to the space between adjacent cells in the same row. By default, LaTeX adds a small amount of space between cells. However, you can adjust the intercell spacing using the \setlength{\tabcolsep}{<length>} command.
Replace <length> with the desired value, such as 10pt or 0.5cm, to increase or decrease the space.
\setlength{\tabcolsep}{10pt} % Increase intercell spacing
\begin{tabular}{ccc}
...
\end{tabular}
Here is an example of increasing the intercell sapcing:
\documentclass{article}
\begin{document}

\section*{LaTeX default cell spacing}
\begin{tabular}{||c|c|c||}
\hline
Column 1 & Column 2 & Column 3 \\
\hline\hline
Row 1, Col 1 & Row 1, Col 2 & Row 1, Col 3 \\
\hline
Row 2, Col 1 & Row 2, Col 2 & Row 2, Col 3 \\
\hline
\end{tabular}

\section*{Increased intercell spacing}
\setlength{\tabcolsep}{20pt}
\begin{tabular}{||c|c|c||}
\hline
Column 1 & Column 2 & Column 3 \\
\hline\hline
Row 1, Col 1 & Row 1, Col 2 & Row 1, Col 3 \\
\hline
Row 2, Col 1 & Row 2, Col 2 & Row 2, Col 3 \\
\hline
\end{tabular}

\end{document}
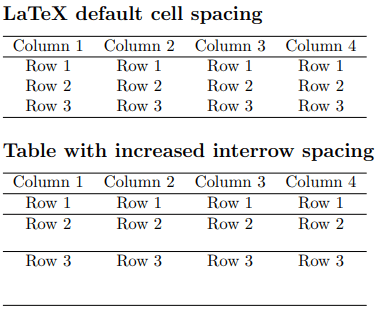
2.Interrow Spacing
Interrow spacing refers to the vertical space between rows. You can add space between rows using the \vspace{<length>} command. Replace <length> with the desired value, such as 2mm or -1cm.
Positive values add space, while negative values reduce space between rows.
\begin{tabular}{ccc}
Row 1 & Row 1 & Row 1 \\
\vspace{3mm} % Add vertical space between rows
Row 2 & Row 2 & Row 2 \\
\end{tabular}
Here is an example of increasing the interrow sapcing:
\documentclass{article}

\begin{document}

\subsection*{LaTeX default cell spacing}
\begin{tabular}{cccc}
\hline
Column 1 & Column 2 & Column 3 & Column 4\\
\hline
Row 1 & Row 1 & Row 1 & Row 1 \\
Row 2 & Row 2 & Row 2 & Row 2 \\
Row 3 & Row 3 & Row 3 & Row 3 \\
\hline
\end{tabular}

\subsection*{Table with increased interrow spacing}
\begin{tabular}{cccc}
\hline
Column 1 & Column 2 & Column 3 & Column 4 \\
\hline
Row 1 & Row 1 & Row 1 & Row 1 \\
\hline
\vspace{10pt}
Row 2 & Row 2 & Row 2 & Row 2 \\
\hline
\vspace{20pt}
Row 3 & Row 3 & Row 3 & Row 3 \\
\hline
\end{tabular}

\end{document}
Cell alignment
LaTeX provides options to align the content within table cells. The most commonly used alignment options are:
l→ left-alignedc→ centeredr→ right-aligned
Here's an example of a table with different cell alignments:
\documentclass{article}

\begin{document}

\begin{tabular}{|l|c|r|}
  \hline
  Left-aligned & Center-aligned & Right-aligned \\
  \hline
  Content & Content & Content \\
  \hline
\end{tabular}

\end{document}

Merging cells
In LaTeX, you can merge cells in a table to create more complex layouts or to group cells together.
1. The multicolumn command
The multicolumn command allows you to specify the number of columns to span and the alignment of the merged cell. Its syntax is as follows:
\multicolumn{<num_cols>}{<alignment>}{<content>}
<num_cols>→ Specifies the number of columns to span with the merged cell.<alignment>→ Specifies the alignment of the merged cell within the spanned columns. It can take values such as l for left-aligned, c for center-aligned, or r for right-aligned.<content>→ The content to be placed in the merged cell.
Here's an example of a table with merged cells:
\documentclass{article}

\begin{document}

\begin{tabular}{|p{2cm}|p{2cm}|p{2cm}|p{2cm}|}
\hline
\multicolumn{4}{|c|}{Group 1} \\
\hline
\multicolumn{2}{|c|}{Category 1} &
\multicolumn{2}{c|}{Category 2} \\
\hline
Data 1 & Data 2 & Data 3 & Data 4 \\
\hline
Data 5 & Data 6 & Data 7 & Data 8 \\
\hline
\end{tabular}

\end{document}

2. The multicolumn command
The \multirow command is used to merge cells vertically in a table. It allows you to create a cell that spans multiple rows. Its syntax is as follows:
\multirow{<num_rows>}{<width>}{<content>}
<num_rows>→ The number of rows that the cell should span.<width>→ The width of the merged cell. You can specify*to automatically adjust the width based on the content of the cell.<content>→ The content that should be placed in the merged cell.
To use the \multirow command, you need to load the multirow package by adding \usepackage{multirow} in the preamble of your LaTeX document.
Here's an example of a table with merged cells using multirow command:
\documentclass{article}
\usepackage{multirow}

\begin{document}
\begin{tabular}{|c|c|c|}
\hline
\multirow{4}{*}{Group 1} & \multirow{2}{*}{Category 1} & Data 1 \\ \cline{3-3}
                         &                             & Data 2 \\ \cline{2-3}
                         & \multirow{2}{*}{Category 2} & Data 3 \\ \cline{3-3}
                         &                             & Data 4 \\ \hline
\end{tabular}

\end{document}
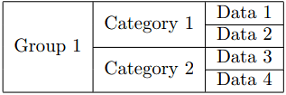
Note that when you use \multirow, you may need to adjust the number of rows in subsequent columns to align the content properly. You can achieve this by using the \cline command to draw horizontal lines that span only a subset of columns.
Adding style
To highlight specific cell contents, you can apply formatting commands, like:
\textbf{}→ to make text bold.\textit{}→ to make text italic.\texttt{}→ to use a monospaced font.- Use the
\small,\large, or other size commands → to change the font size.
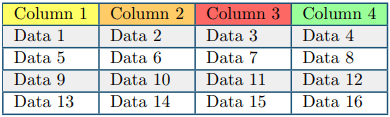
Coloring cells
Using colors in tables allows you to enhance the visual appeal and highlight important information in your LaTeX documents. To add color to specific cells or rows, LaTeX offers packages like colortbl or xcolor, creating visual emphasis or grouping within the table.
The colortbl package provides several commands for coloring tables in LaTeX. Here are some commonly used commands:
| Command | Description |
|---|---|
\columncolor[<model>]{<color>} | Sets the background color for a specific column |
\rowcolor[<model>]{<color>} | Sets the background color for a specific row. It is used at the beginning of the row. |
\cellcolor[<model>]{<color>} | Sets the background color for a specific cell. It is used inside a cell to color it. |
\arrayrulecolor[<model>]{<color>} | Sets the color of the table borders. |
\arrayrulewidth | Determines the width (thickness) of the rules (lines) used in tables. |
In the commands mentioned above:
- The optional
<model>argument specifies the color model (rgb, cmyk, gray, HTML, etc.) - The
<color>argument specifies the desired color.
To change the width of the table rules, you can use the command:
\setlength{\arrayrulewidth}{<width>}
where <width> represents the desired thickness. The <width> can be specified in various units such as points pt, millimeters mm, or inches in.
Here's an example of a table with colored cells and rules:
\documentclass{article}
\usepackage[table]{xcolor}
\setlength{\arrayrulewidth}{0.3mm}
\arrayrulecolor[HTML]{1A5276}

\begin{document}

\begin{tabular}{|l|l|l|l|}
\hline
\cellcolor[HTML]{FFFE65}Column 1 &
\cellcolor[HTML]{FFCC67}Column 2 &
\cellcolor[HTML]{FD6864}Column 3 &
\cellcolor[HTML]{9AFF99}Column 4 \\ \hline
\rowcolor[HTML]{EFEFEF}
Data 1 & Data 2 & Data 3 & Data 4 \\ \hline
Data 5 & Data 6 & Data 7 & Data 8 \\ \hline
\rowcolor[HTML]{EFEFEF}
Data 9  & Data 10 & Data 11 & Data 12 \\ \hline
Data 13 & Data 14 & Data 15 & Data 16 \\ \hline
\end{tabular}

\end{document}
Adding captions, labels and references to tables
Adding captions and labels to tables in LaTeX allows you to provide a description or title for the table and refer to it within your document. This is particularly useful when you have multiple tables and need to reference them by their numbers.
Here are some commonly used commands:
-
\caption{<caption-text>}To add a caption to a table, you can use the\captioncommand within a table environment. The caption provides a title for the table. -
\label{<label-name>}To assign a label to a table, you can use the\labelcommand which should be placed immediately after the caption. The label should be unique and can be any user-defined name. -
\ref{<label-name>}Once you have assigned a label to a table, you can refer to it elsewhere in the document using the\refcommand. This command will automatically generate the corresponding table number.
Here's an example of how to reference a table using the commands mentioned above:
\documentclass{article}
\usepackage[table]{xcolor}
\usepackage{hyperref}

\begin{document}
\noindent
Using captions, labels, and references enhances the readability and professionalism of your document, allowing readers to easily locate and refer to specific tables. Table \ref{table:1} is an example of a referenced \LaTeX{} table with caption.

\begin{table}[h!]
\centering
\begin{tabular}{|l|l|l|l|}
\hline
\rowcolor[HTML]{FFFE65}
Column 1 & Column 2 & Column 3 & Column 4 \\
\hline
Data 1 & Data 2 & Data 3 & Data 4 \\ \hline
\rowcolor[HTML]{E8DAEF}
Data 5 & Data 6 & Data 7 & Data 8 \\ \hline
Data 9  & Data 10 & Data 11 & Data 12 \\ \hline
\rowcolor[HTML]{E8DAEF}
Data 13 & Data 14 & Data 15 & Data 16 \\ \hline
\end{tabular}
\caption{Referenced table with caption and label.}
\label{table:1}
\end{table}
\end{document}
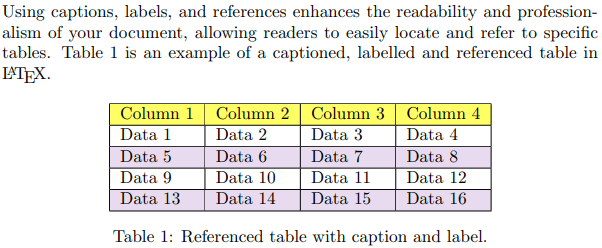
To use clickable references, you need to include the hyperref package in your LaTeX document by adding the following line to the preamble:
\usepackage{hyperref}
After including the hyperref package, the references created using the \ref command will become clickable hyperlinks. By clicking on the reference, the reader will be navigated to the corresponding table or any other labeled element.