Page Layout
Welcome to the world of page layout, where creative process of arranging text, images, and other elements on a page makes information easier to read and understand.
Introduction
Page layout is a fundamental aspect of design and document creation. It involves the art of organizing content on a page to optimize readability and visual appeal. Here's why page layout matters:
- Visual appeal → A well-structured page layout enhances the visual appeal of LaTeX documents, making them more engaging for readers.
- Information organization → Effective layout in LaTeX helps arrange information hierarchically, guiding readers through content seamlessly.
- Readability → Proper page layout ensures that the text is easy to read, reducing the cognitive load on readers.
- Consistency → LaTeX's page layout settings allow for consistent branding and styling throughout a document.
- Professionalism → Proficiency in page layout is vital for producing high-quality academic papers, reports, theses, and more.
Mastery of LaTeX's page layout features is essential for individuals in academic, scientific, and technical fields who seek to create polished and well-structured documents.
The concept of page layout in LaTeX
In LaTeX, the concept of page layout refers to the arrangement and formatting of content on a page within a document. LaTeX provides powerful tools for controlling the way text, images, headers, footers, and other elements are organized and presented on each page. The essential elements of page layout in LaTeX include:
-
Page Dimensions and Margins
LaTeX allows you to set the size of the page (paper size) and adjust the margins, both the top, bottom, left, and right margins. -
Page Orientation
You can specify whether the page should be in portrait or landscape orientation. Landscape pages are particularly useful for wide tables or graphics. -
Header and Footer
LaTeX enables you to define and customize the content in headers (the top of the page) and footers (the bottom of the page). This is where you typically place page numbers, document titles, and other information. -
Page Numbering
LaTeX offers different options for numbering pages. You can control the style, format, and starting page number for your document. -
Paragraph and Text Layout
You can specify line spacing, paragraph indentation, and text alignment to control how text appears on the page. LaTeX also allows you to work with fonts, font sizes, and styles. -
Figures and Tables
LaTeX provides tools to control the placement of figures and tables within your document. You can use floating environments to ensure these elements appear where you want them while maintaining proper text flow. -
Columns and Multicolumn Layout
LaTeX supports multi-column layouts, allowing you to divide your page into multiple columns. This is useful for newsletters and other documents where text needs to flow in a non-standard way. -
Custom Page Styles
You can create custom page styles using the fancyhdr package. This lets you define unique headers, footers, and other page elements. -
Landscape Pages \ LaTeX allows you to insert landscape pages within a predominantly portrait-oriented document. This is beneficial when you need to display wide content like charts or graphs.
-
Title Page
LaTeX includes options for creating title pages, which are commonly used for formal documents like theses or reports.
Basic page layout settings
In LaTeX, controlling the layout of your document starts with defining three critical parameters:
- paper size
- margins
- page orientation
Properly configuring these elements affects the readability and overall quality of your document.
Paper size
Paper size defines the dimensions of your document. Common paper sizes include A4, letter, legal, A3 and more.
To change the paper size in a LaTeX document, you can use the geometry package. Here's how you can change the paper size:
-
Include the geometry package
Add the following line in your LaTeX document preamble to include the geometry package:\usepackage{geometry} -
Specify the Paper Size
After including the package, you can specify the desired paper size. For example, to set the paper size to A4 (which is 210mm × 297mm), add the following line:\geometry{a4paper}Here are some of the most commonly used options:
Option Command Paper size Letter Paper \geometry{letterpaper}8.5 inches × 11 inches or 216mm × 279mm Legal Paper \geometry{legalpaper}8.5 inches × 14 inches or 216mm × 356mm A3 Paper \geometry{a3paper}297mm × 420mm or 11.69 inches × 16.54 inches -
Custom Paper Sizes
If you want to set a custom paper size, you can specify it directly by providing thepaperwidthandpaperheightparameters. For example, to set a custom size of 8 inches × 10 inches, use:\geometry{paperwidth=8in, paperheight=10in}
Margins
Margins are the white spaces around the text or images, separating the content from the edges of the paper. LaTeX allows you to customize margins using the geometry package.
You can set the margins explicitly with parameters like left, right, top, and bottom. Here's an example of setting margins on all sides:
\geometry{left=1in, right=1in, top=2in, bottom=2in}
The geometry package should be included in the preamble of your document.
Here are the commonly used parameters to set page margins:
| Parameter | Description |
|---|---|
margin | Set all margins (left, right, top, and bottom) simultaneously. |
inner | Set the width of the inner margin (toward the binding side in double-sided documents). |
outer | Set the width of the outer margin (opposite the binding side in double-sided documents). |
head | Set the height of the header area. |
foot | Set the height of the footer area. |
headsep | Determines the separation between the header and the text. |
footskip | Specifies the separation between the footer and the text. |
Page Orientation
Page orientation determines whether the page is in portrait (vertical) or landscape (horizontal) mode.
LaTeX documents are typically in portrait mode. To set the page orientation to landscape, you can use the landscape option within the \geometry command:
\geometry{landscape}
The geometry package should be included in the preamble of your document.
You can also control page orientation by including packages like pdflscape or lscape.
pdflscape package
The pdflscape package allows you to rotate individual pages to landscape mode while keeping the rest of the document in portrait orientation.
For example to switch to landscape mode for a single page:
-
Include the
pdflscapepackage:\usepackage{pdflscape} -
Wrap the content to be rotated with the
landscapeenvironment:\begin{landscape} % Your landscape-oriented content goes here \end{landscape}Here's a complete example:
\documentclass{article}
\usepackage{pdflscape}

\begin{document}

This page is in portrait orientation.

\begin{landscape}
  This page is in landscape orientation. It's perfect for wide tables, figures, or anything that benefits from a broader layout.
\end{landscape}

This page returns to portrait orientation.

\end{document}
An alternative method for controlling the layout of your document
Instead of specifying paper size, margins, and orientation using the \geometry command, as demonstrated in this example:
\usepackage{geometry}

\geometry{
  a4paper,
  margin=1in,
  landscape,
}
You can include them as options within the \usepackage statement in your document's preamble:
\usepackage[a4paper, margin=1in, landscape]{geometry}
Page layout visualization in LaTeX
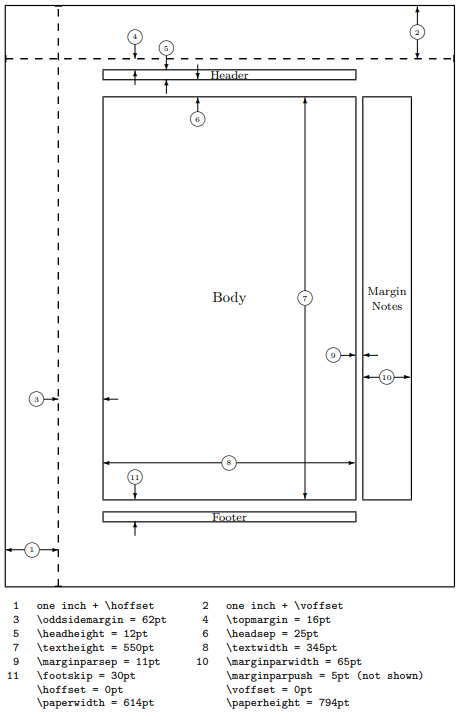
In LaTeX, visualizing the layout involves displaying a representation of your document's page layout, which includes page dimensions, margins, header and footer positions, and other layout-related details. This visualization can be quite helpful during the document design process, aiding in understanding and visualizing the current layout settings.
LaTeX provides two primary commands for page layout visualization:
-
\layout: This standard LaTeX command generates a basic layout diagram with information about page dimensions, margins, text block, headers, and footers. -
\layout*: The enhanced version provided by the layout package, which offers more comprehensive details about the layout, including exact measurements of margins and their distances from the text block.
Here's a basic example of the \layout command in LaTeX:
\documentclass{article}
\usepackage{layout}

\begin{document}
\layout % visualizing the layout
\end{document}
This example generates the following output:
Multi-column layouts
LaTeX provides several methods for creating multi-column pages, allowing you to organize content efficiently. There are a few different ways to create multi-column pages, depending on your specific needs and preferences. Here are the main methods for achieving multi-column layouts:
-
Using the
twocolumndocument class option
By using thetwocolumnas option of\documentclasscommand, the page will be divided into two columns:\documentclass[twocolumn]{article} \usepackage{lipsum} \begin{document} \section{First Column} The content in the first column. \lipsum[1-3] \section{Second Column} The content in the second column. \lipsum[4-7] \end{document}This example generates the following output:

-
Using the
multicolpackage
The most common and versatile way to create multi-column pages is by using themulticolpackage. It provides a straightforward and flexible approach.First include the package in the preamble of your document:
\usepackage{multicol}and then use the
multicolsenvironment to specify the number of columns and control column layout:\begin{multicols}{<number of columns>} % Document content \end{multicols}Replace
<number of columns>with the desired column number, such as 2 for two columns.Here's an example of a page with three columns using the multicol package:
\documentclass{article} \usepackage{multicol} \usepackage{lipsum} \begin{document} \begin{multicols}{3} \section{Column 1} \lipsum[1-2] \section{Column 2} \lipsum[3-4] \section{Column 3} \lipsum[5-6] \end{multicols} \end{document}This example generates the following output:

-
LaTeX's built-in commands:
\twocolumnand\onecolumn
You can use the built-in\twocolumnand\onecolumncommands to switch between single-column and two-column layouts within your document:% Start in one-column mode \twocolumn % Content for two-column layout \onecolumn % Return to one-column mode % Content for one-column layout -
Custom packages
If you need more control or a different column layout, you can use packages likeparacolorflowframto define custom multi-column layouts. These packages provide additional customization options.